
Get In Touch
The Before-and-After Effect: Why Project Photos Are Your Best Marketing Asset as a Builder
By Tony
June 5, 2026 14 mins
Share this post
Digital Marketing Solutions Tailored for Construction, Roofing, and Shed Businesses
Digital Marketing Solutions Tailored for Construction, Roofing, and Shed Businesses
Digital Marketing Solutions Tailored for Construction, Roofing, and Shed Businesses
Key Takeaways
- Project photos are the only marketing asset that simultaneously proves your capability, builds trust, and creates an emotional response in a potential buyer all in under three seconds.
- Before-and-after photos outperform every other content type in engagement, conversion, and shareability for builders and contractors across every digital platform.
- Most builders are sitting on a goldmine of unused visual content completed projects that were never photographed, or photographed poorly and never published anywhere.
- The quality bar for effective project photos is not “professional photography.” It’s “clearly shows the quality of the work” achievable with any modern smartphone in under five minutes.
- Where you publish project photos matters as much as how you take them the same photo deployed across your website, Google Business Profile, Facebook page, and in a follow-up email to a prospect does completely different jobs in each location.
- A consistent photo-capture habit, built into your job closeout process, compounds over months into a visual portfolio that becomes your most durable competitive advantage.
The Moment a Customer Decides to Trust You
Before a homeowner signs a contract with a builder, they go through a mental checklist that’s largely unconscious but completely predictable.
Can this person actually do what they say they can do? Have they done something like my project before? Will my home look like that when they’re done?
These questions are about capability and proof. And no amount of clever copywriting, polished branding, or competitive pricing answers them as directly as a single well-captured before-and-after photo of a project that looks like theirs.
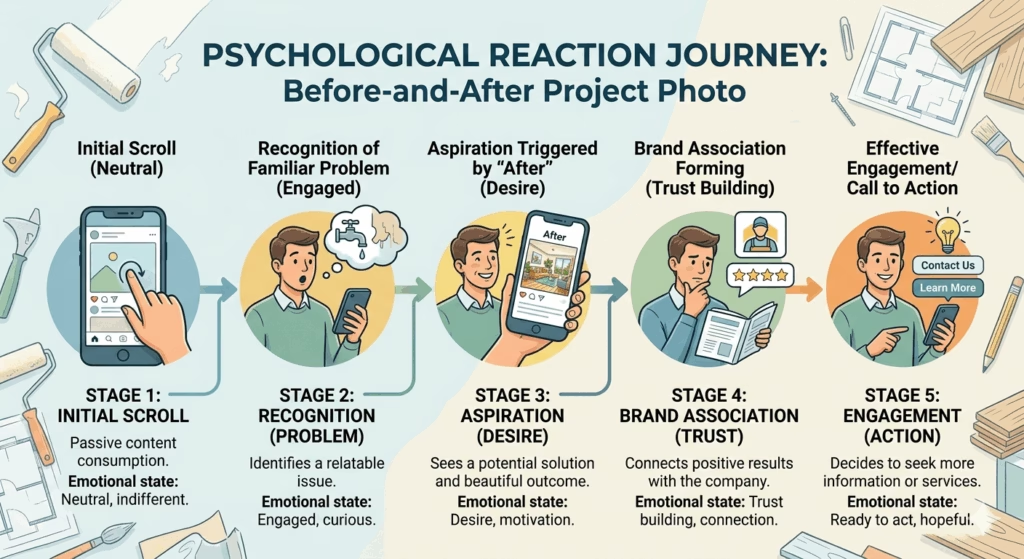
In three seconds, a buyer who sees a relevant project photo goes from skeptical stranger to interested prospect. That’s not a metaphor it’s the documented psychology of visual social proof, and it’s why builders who consistently publish quality project photos generate more inquiries, convert at higher rates, and close with less price resistance than those who don’t.
The frustrating part? Most builders already have the raw material for this. They’ve completed dozens, maybe hundreds, of projects that prove exactly what they can do. Most of those projects were photographed poorly, or never photographed at all, or photographed and then buried in a camera roll where they do exactly zero marketing work.
This post is about how to fix that and how to turn the work you’re already doing into the most effective marketing content in your toolkit.
Why Before-and-After Photos Work So Well for Builders Specifically
Before-and-after content is powerful in every industry. For builders and contractors, it’s uniquely effective for three reasons that don’t apply the same way anywhere else.
1. The Stakes Are Unusually High
Hiring a roofer, a general contractor, or a shed builder is not a low-risk purchase. A homeowner is handing over thousands sometimes tens of thousands of dollars for work that will affect the safety, function, and value of their most important asset.
When the stakes are this high, buyers need to see proof before they feel comfortable enough to proceed. A description of your process, a list of your certifications, even a stack of glowing testimonials none of these answer the fundamental question as viscerally as seeing a finished project that looks like what the buyer has in their head.
The before photo does something equally important: it shows that you’ve faced the same starting conditions. A deteriorated roof, a weathered deck, a cluttered yard that needed a storage solution. The “before” contextualizes the “after” and makes the transformation feel achievable and relevant.
2. The Product Is Inherently Visual
A deck, a roof, a custom shed, a renovated kitchen these are things you look at. Unlike services where the value is invisible (accounting, legal advice, financial planning), a builder’s output is something a buyer can evaluate with their eyes.
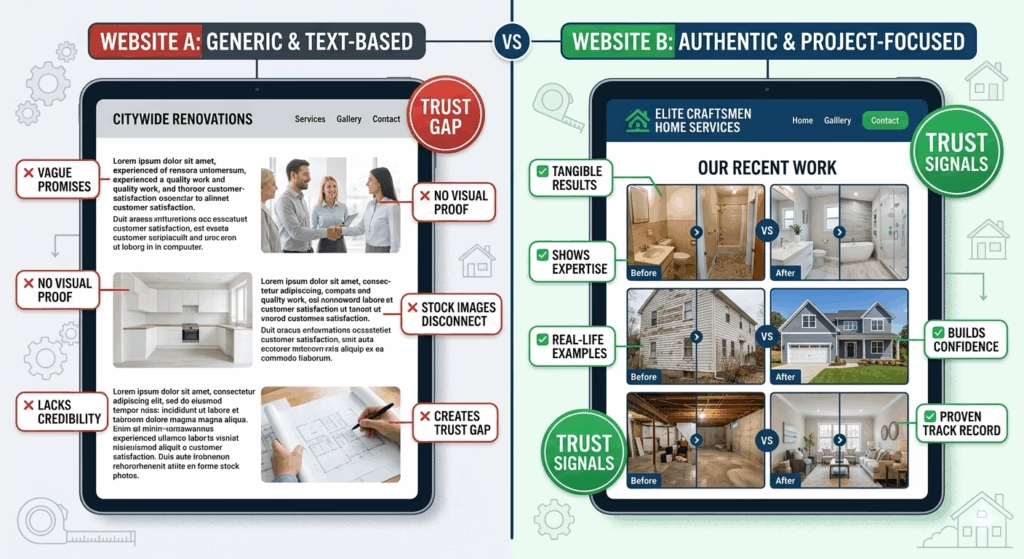
This means your marketing should be primarily visual. When it’s not when it’s mostly text, mostly logos, mostly generic descriptions of your “commitment to quality” you’re choosing the weakest possible medium for the message you need to communicate.
Before-and-after photos are the native format for what you do. They show the product in context. They demonstrate scale. They show the difference between the starting point and the outcome. There is no text equivalent.
3. They Create Aspiration
This is the subtlest but most powerful mechanism of project photo marketing: the best before-and-after photos don’t just prove capability. They make the viewer want what’s in the “after.”
A homeowner scrolling Facebook who wasn’t thinking about a new deck sees your before-and-after of a beautifully completed cedar deck with a pergola. Suddenly they’re thinking about their own backyard. The seed is planted. They follow your page. Two months later, when they decide to do something about it, yours is the first name that comes to mind.
This is demand creation marketing that generates interest before a buyer even enters the consideration phase. It’s what separates builders with overflowing pipelines from ones who are constantly scrambling for the next job.
The Anatomy of a High-Impact Before-and-After Photo
Not all before-and-after photos are created equal. The difference between a photo that generates inquiries and one that gets scrolled past is almost always in the execution how it was taken, what was in the frame, and how it was presented.
Here’s what separates a high-impact set from a forgettable one.
The Before Photo: Show the Real Problem
The temptation when capturing a “before” is to sanitize it to take a photo that doesn’t look too bad, because you don’t want to be associated with substandard conditions.
Resist this impulse. The worse the “before” looks, the more dramatic the transformation appears in the “after.” The goal is contrast.
What makes a strong “before” photo:
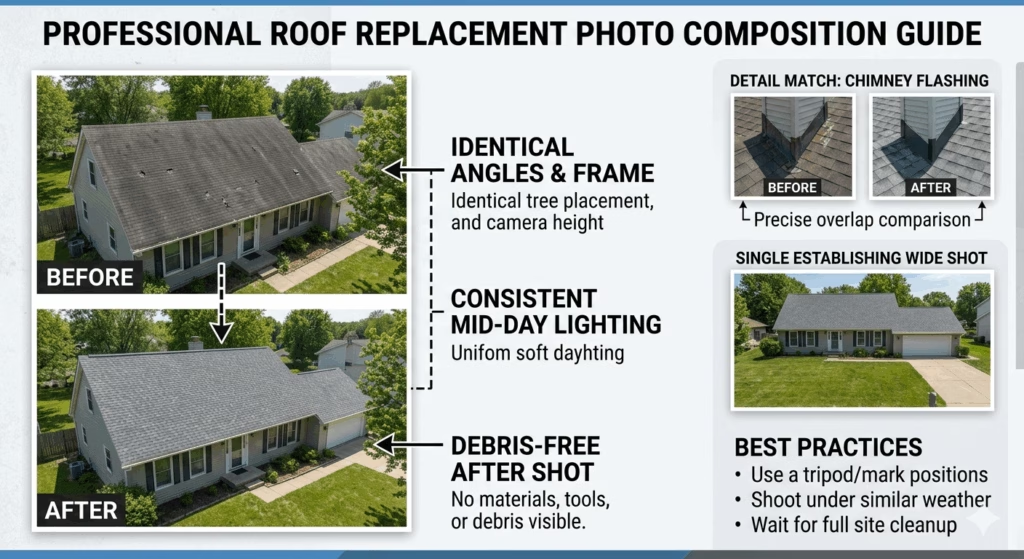
- Shoot from the same angle you’ll use for the “after.” This is the most commonly missed technique. If the before and after aren’t shot from identical positions, the viewer can’t register the full transformation. Pick your angle before work starts and mark it mentally so you can return to the exact spot at completion.
- Include the full scope of the problem. If the roof has visible storm damage, missing shingles, and sagging sections, show all of it. If the deck is rotted and listing, capture that context. The viewer needs to understand what you were working with.
- Shoot in consistent lighting. Overcast days are ideal for both before and after shots soft, even light with no harsh shadows. Avoid shooting midday sun directly, as it creates contrast issues and can wash out details.
- Clear the frame of clutter that isn’t part of the project. Remove your own vehicles, equipment, and debris from the shot unless it’s specifically part of the “before” context (a cluttered yard that a shed will solve, for example).
The After Photo: Make the Work Look Its Best
The “after” photo is your portfolio piece. It’s what buyers save to their phones when they’re planning a project. It’s what gets shared on neighborhood Facebook groups. It needs to be shot with intention.
What makes a strong “after” photo:
- Shoot from the same angle as the before. Non-negotiable for maximum impact.
- Timing matters. For outdoor projects, shoot in the golden hour the 30–60 minutes after sunrise or before sunset. The warm, directional light makes building materials look richer and more three-dimensional. For interior projects, shoot with interior lights on and natural light supplemented.
- Remove all job-site evidence. Equipment, materials, vehicles, debris, signage all gone. The frame should show only the completed project in its context, as if it’s been there for years.
- Take multiple angles. The same project photographed from five angles produces five times the content. Wide establishing shots show scale. Close-up detail shots show craftsmanship. An elevated angle (from a ladder or second-story window) can show scope that ground-level shots miss.
- Include human scale when possible. A wide deck looks more impressive when a person is standing on it. A large shed looks more substantial next to a person walking past it. Scale is hard to convey without a reference point.
- Shoot the details. Ridge caps, flashing, custom window trim, joinery, hardware these details are invisible to the untrained eye but legible to buyers who are evaluating quality. A tight shot of a perfectly installed valley or a beautifully finished deck rail communicates craftsmanship without a single word of explanation.
Smartphone Photography Techniques That Actually Work in the Field
You do not need a professional camera. The cameras in current-generation smartphones are more than capable of producing marketing-quality images if you follow a handful of basic techniques.
Use portrait mode strategically. Portrait mode (available on most modern smartphones) creates a shallow depth of field effect that makes the subject pop against the background. Use it for detail shots roofing materials, deck joinery, hardware. Don’t use it for wide establishing shots, where you need everything in focus.
Tap to focus and expose. Don’t let your phone decide what to focus on. Tap directly on the most important element in the frame the roof ridge, the deck surface, the finished siding to ensure it’s sharp and properly exposed.
Shoot in HDR mode for exterior shots. HDR (High Dynamic Range) combines multiple exposures to prevent blown-out skies and underexposed shadows in high-contrast outdoor conditions. Most phones have this as a setting or do it automatically.
Never zoom digitally. Walk closer to your subject instead of pinching to zoom. Digital zoom degrades image quality significantly. Optical zoom (available on some phones) is acceptable; digital zoom is not.
Edit before publishing but lightly. A quick pass in your phone’s native photo editor can make a significant difference. Slightly increase brightness and contrast. Boost “vibrance” (not saturation) to make colors pop without looking artificial. Straighten any horizons that aren’t level. This takes under 60 seconds and makes photos noticeably more professional.
Shoot more than you think you need. Take 15–20 shots per angle from slightly different positions and distances. Delete the weak ones later. The cost of an extra photo is zero. The cost of returning to a job site for a reshoot is high.
Where to Publish Project Photos (And What Each Platform Does for You)
Taking great photos is only half the equation. The other half is understanding where to publish them, and what job each platform does in your marketing system.
Your Website: The Conversion Engine
Your website is where before-and-after photos do their most important work converting a visitor who found you through search into a lead who contacts you.
Every service page on your website should include project photos of that specific service. A visitor on your “Metal Roof Installation” page should see metal roof projects. A visitor on your “Deck Construction” page should see deck projects. Generic photos, or photos of a different service than the page is about, create a disconnect that undermines trust at the exact moment you’re trying to build it.
A dedicated portfolio or gallery page organized by project type also serves an important SEO function. Pages with relevant, original images indexed by Google tend to rank better than text-heavy pages with no visual content, particularly for local search queries.
Critically: Always add descriptive alt text to every image on your website. Alt text tells Google what’s in the photo a key factor in appearing in Google Image Search, which is an underappreciated source of inbound traffic for builders.
Example alt text: “Before and after photos of a complete asphalt shingle roof replacement on a two-story colonial home in Wichita, Kansas, showing storm damage before and new GAF Timberline HDZ shingles after.”
Google Business Profile: The Local Ranking Signal
Your Google Business Profile (GBP) photo gallery is one of the most overlooked marketing assets available to builders and one of the most impactful for local search visibility.
Google’s own data shows that businesses with more photos receive significantly more clicks, calls, and direction requests than those with few or no photos. For a builder’s GBP specifically:
- Upload at least 20–30 project photos before-and-after sets
- Add new photos consistently at minimum, one or two after each completed project
- Include photos of your team, your vehicles, and your materials alongside project photos
- Label photo file names descriptively before uploading (not “IMG_4892.jpg” but “metal-roof-replacement-wichita-ks.jpg”)
GBP photos are indexed by Google and appear in local search results, Google Maps, and directly on your business listing. They’re often the first visual impression a potential customer has of your work before they even visit your website.
Facebook: The Social Proof and Referral Engine
On Facebook, before-and-after project photos are your highest-performing organic content consistently outperforming promotional posts, shared articles, and even video in many cases.
When a neighbor sees a post of a completed deck build two streets from their house, the relevance is immediate and personal. That’s their neighborhood. That could be their yard. The local specificity of project photos is something no other content type can replicate.
Best practices for Facebook project posts:
- Post the before and after as a two-photo post, or as an album of multiple angles
- Write a caption that’s personal and specific include the neighborhood or city, describe what challenge was solved, give one detail that shows expertise
- Tag the location in the post
- Ask satisfied customers if you can tag them tagged posts reach their entire network organically
- Respond to every comment, especially questions about the project
A Facebook post that generates high engagement comments, shares, saves also signals to Facebook’s algorithm that the content is worth showing to more people. Project photos consistently generate this kind of engagement because they’re genuinely interesting to local homeowners.
Instagram: The Visual Portfolio
Instagram functions differently from Facebook for builders. Where Facebook drives local engagement and referrals, Instagram builds aspirational brand perception over time the impression that your work is beautiful, your standards are high, and your business is one worth paying attention to.
The Instagram algorithm in 2025 heavily favors Reels short vertical videos. A 30–60 second time-lapse or process video of a project installation, ending with the finished result, will outperform a static before-and-after in reach and new follower acquisition. But static posts still serve the portfolio function and should be part of a consistent mix.
Consistency matters more on Instagram than any other platform. A grid with 80 high-quality project photos, posted consistently over 12 months, builds a visual portfolio that functions as a living gallery every prospect can review before they ever contact you.
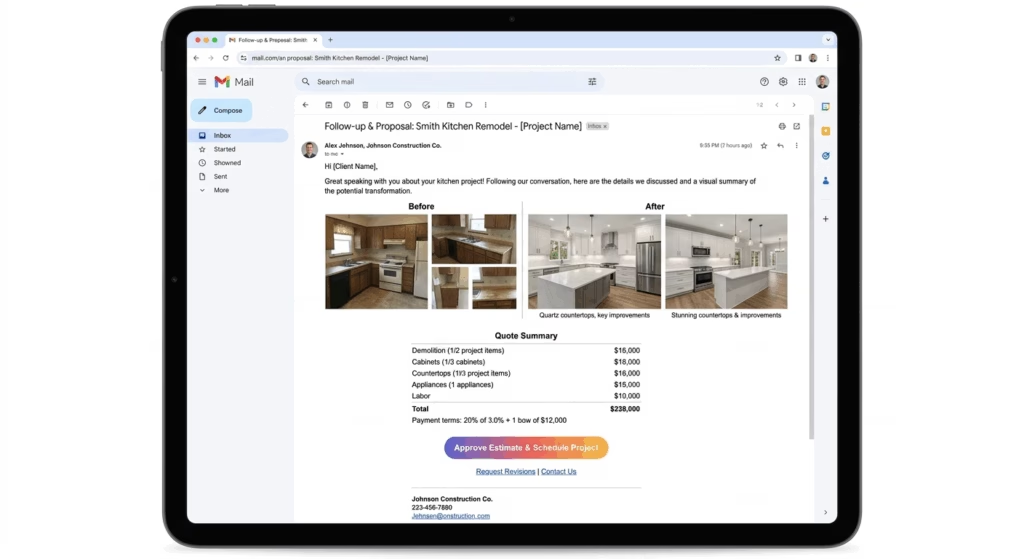
Email Follow-Up: The Trust Builder in the Sales Cycle
This use case is underutilized and highly effective: sending before-and-after project photos directly to prospects during the estimate and follow-up process.
When a homeowner requests a quote for a roof replacement, including two or three before-and-after photos of similar projects in your follow-up email accomplishes something a price sheet alone cannot it shows them what their finished roof could look like, from a company that has done exactly this kind of project before.
This is relevant social proof delivered at exactly the right moment in the decision process. It reduces price resistance because the buyer isn’t comparing numbers anymore they’re comparing outcomes. And your outcomes are visible.
Building the Photo Capture Habit: A System That Runs on Autopilot
The biggest obstacle to consistent project photography isn’t skill or equipment it’s remembering to do it in the middle of a busy job site day.
The solution is making it a non-negotiable part of your job process rather than an afterthought.
The Three-Step Job Site Photo Protocol
Step 1 — Before work begins: Take five before photos from five angles before a single piece of material is touched. This is the only time you’ll have the “before.” Once work starts, the opportunity is gone.
Step 2 — During the project: Take progress shots that document the process stripped decking, framing, mid-install stages. These become behind-the-scenes content for social media and demonstrate the thoroughness of your approach.
Step 3 — At project completion: Before the crew leaves and before any equipment is removed, take the after photos. Same angles as the before. Multiple perspectives. Detail shots of craftsmanship highlights.
Build this protocol into your job closeout checklist. Make it as non-negotiable as collecting final payment. If crew leads are managing site completion, brief them on what shots to capture and consider making it a required step before marking a job complete.
Organizing Your Photo Library
A common failure mode: photos are taken but never organized, making them impossible to use efficiently.
Set up a simple folder structure on your phone or a shared cloud storage (Google Drive or Dropbox work well) organized by:
- Project type (Roofing, Decks, Sheds, Siding, etc.)
- Month/Year
- Location (optional but useful for geo-specific content)
Each completed project gets its own subfolder with before, during, and after photos clearly labeled. This takes 60 seconds to set up per project and saves hours of searching when you need a specific photo for a website update, a social post, or a sales email.
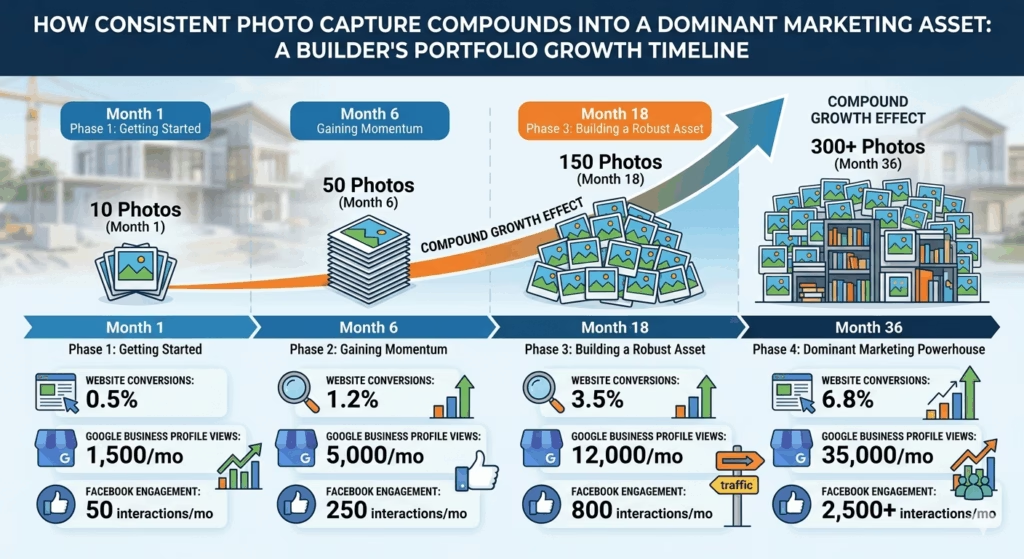
The Compound Effect: What Happens When You Do This Consistently
Here’s the long-term picture that most builders never fully appreciate:
Every project photo you take and publish is a permanent marketing asset. A before-and-after posted to your Google Business Profile today will still be driving trust and inquiries five years from now. A project photo on your website that ranks in Google Image Search will send traffic indefinitely.
Unlike paid advertising which stops the moment you stop paying a photo library compounds over time. One hundred photos tell a story of depth and experience that ten photos cannot. A portfolio of 200 projects communicates something about scale and track record that no written claim ever could.
Builders who’ve been consistently photographing and publishing their work for three years have a visual portfolio that functions as a 24/7 sales team. Their Google Business Profile gallery tells a story of consistent, high-quality output across dozens of project types and locations. Their website gallery is a confidence-builder that converts skeptical visitors into ready-to-schedule prospects.
This is the compound effect of a consistent photo habit and it’s one of the few marketing investments that produces increasing returns over time rather than diminishing ones.
A strong photo library also amplifies every other marketing channel you invest in. Better photos make your website design more effective. Better photos make your social media presence more engaging. Better photos make your Google Ads more click-worthy. Better photos make your Google Business Profile more visible. You’re not just building content you’re improving the return on every other marketing dollar you spend.
Common Mistakes That Waste Good Photos
Even builders who take photos regularly often undermine their impact through avoidable errors.
Publishing without editing. A two-minute edit pass brightness, contrast, horizon straightening can turn a mediocre photo into a strong one. Unedited phone photos often look flat and slightly underexposed. Spend the time.
Using only wide shots. Wide establishing shots show scope. Detail shots show quality. You need both. A photo library with only wide shots fails to communicate craftsmanship. A library with only close-ups fails to communicate scale.
Never posting the before. Some builders only post the glamorous “after” photo, skipping the before entirely. This is a missed opportunity the contrast between before and after is what generates the emotional response. Don’t skip it.
Posting inconsistently. Fifteen photos posted in one day followed by three weeks of silence does not build a following or a search presence. Spread your content out. Two or three posts per week, consistently, outperforms a burst of activity every time.
Ignoring alt text and file names. Every photo published online should have a descriptive file name and alt text. This is one of the lowest-effort, highest-impact SEO actions available to builders, and almost no one in the trades does it consistently.
Never repurposing. A single before-and-after set, captured well, can be published as a Facebook post, an Instagram post, added to your website gallery, sent in a sales follow-up email, uploaded to Google Business Profile, and included in a blog post. That’s six uses from one five-minute photo session. Most builders use a photo once and move on.
Your 30-Day Photo System Launch Plan
You don’t need to overhaul everything at once. Here’s how to build the habit in a month.
Week 1 — Set Up the Infrastructure
- Create a folder structure in Google Drive or Dropbox for organizing project photos by type
- Set a phone reminder for every job start day: “Take before photos”
- Add “Project photos” to your job closeout checklist
Week 2 — Build the Capture Habit
- Take before, during, and after photos on every active job this week
- Spend five minutes editing the best shots from each job
- Organize them into your new folder structure
Week 3 — Start Publishing
- Upload your best three before-and-after sets to your Google Business Profile
- Post one before-and-after project photo to Facebook with a two-to-four sentence caption
- Add at least one project photo set to the relevant service page on your website, with descriptive alt text
Week 4 — Systematize and Expand
- Brief any crew leads on the photo protocol what to capture and when
- Review your photo library: how many usable before-and-after sets do you have?
- Plan your next 30 days of social media content using photos already captured
The Bottom Line
You’re already doing the work. You’re already creating the outcomes that buyers want to see. The only question is whether you’re capturing them in a way that makes that work visible and deploying that visibility in the places where buyers are making decisions.
Before-and-after project photos are not a nice-to-have marketing tactic. They’re the single most honest, most persuasive, and most durable marketing asset available to a builder. They prove what no brochure can prove, communicate what no testimonial can fully communicate, and compound over time in a way that no paid ad campaign can replicate.
Build the habit. Capture the work. Publish it consistently.
The builders who do this methodically, over months and years end up with something their competitors can’t easily buy: a visual track record so strong that closing the sale becomes almost secondary to showing up.
Recent Post
Seasonal Marketing: How Smart Contractors Stay Busy in the Slow Season
What Does a $1,500/Month Marketing Budget Actually Get a Shed or Construction Business?
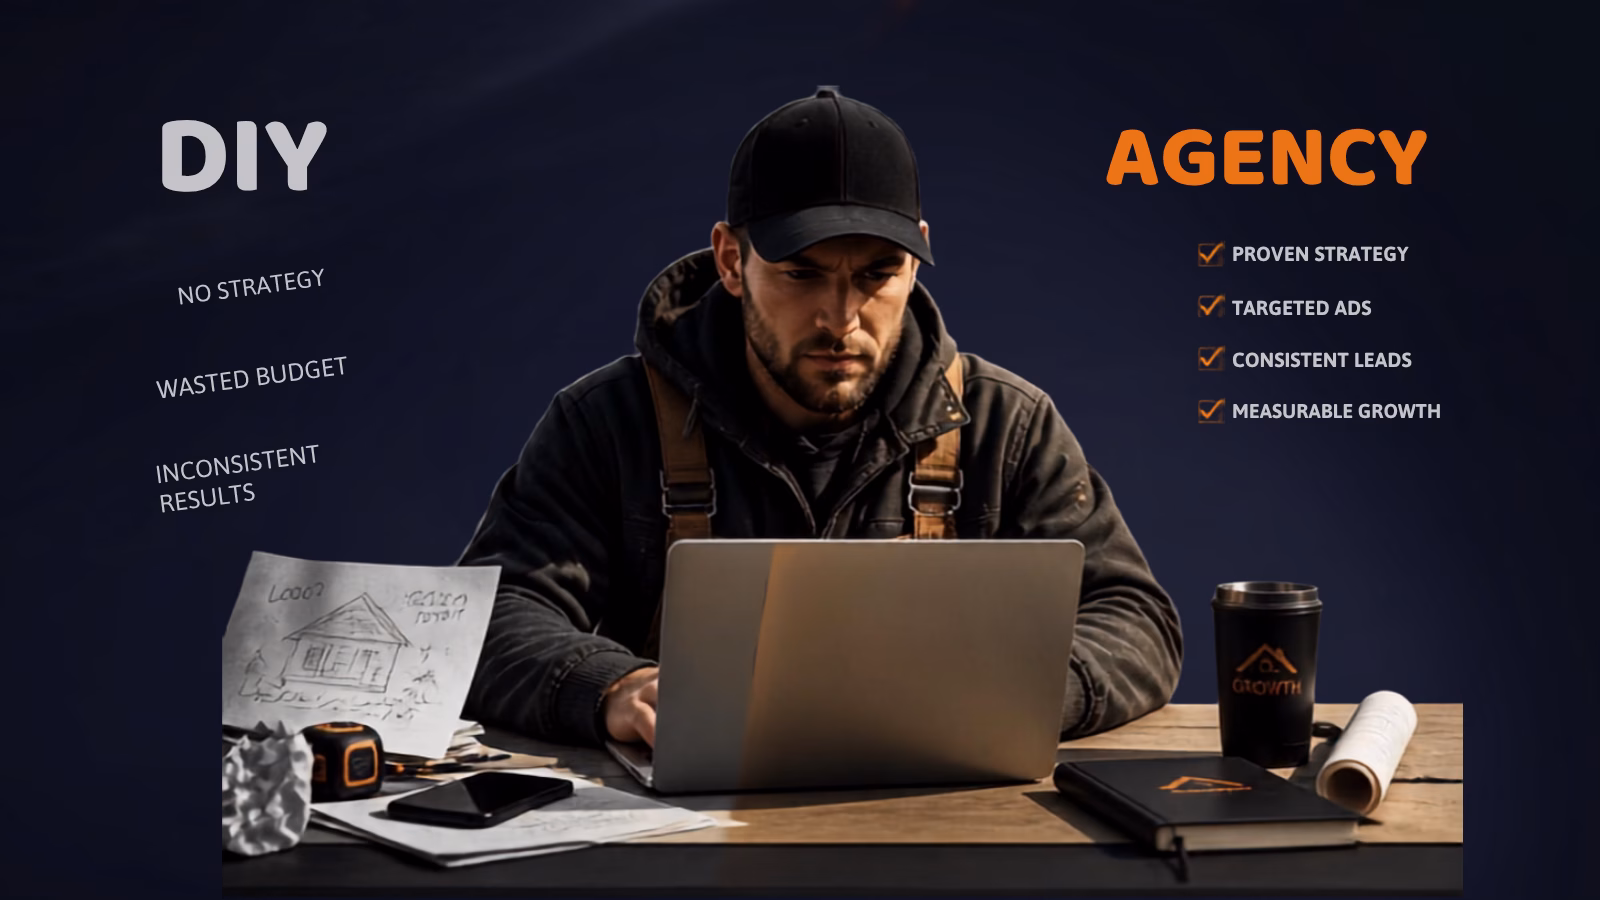
DIY vs. Agency: Should a Roofing Company Handle Their Own Marketing?
7 Signs Your Construction Company’s Website Is Losing You Jobs (And How to Fix It)
Google Business Profile vs. Google Ads: Which One Should a Contractor Invest in First?
Categories
You Might Also Like
Explore additional articles based on your interests.
View All

Pudgy Squirrel Marketing
The Anatomy of a High-Converting Contractor Website: What Customers Actually Look for Before Calling
Read More

Pudgy Squirrel Marketing
Seasonal Marketing: How Smart Contractors Stay Busy in the Slow Season
Read More

Pudgy Squirrel Marketing
What Does a $1,500/Month Marketing Budget Actually Get a Shed or Construction Business?
Read More
Pudgy Squirrel Marketing
DIY vs. Agency: Should a Roofing Company Handle Their Own Marketing?
Read More

Pudgy Squirrel Marketing
7 Signs Your Construction Company’s Website Is Losing You Jobs (And How to Fix It)
Read More

Pudgy Squirrel Marketing
Google Business Profile vs. Google Ads: Which One Should a Contractor Invest in First?
Read More
Pudgy Squirrel Marketing
How Much Should a Roofing or Construction Company Spend on Marketing? (A No-BS Breakdown)
Read More
Pudgy Squirrel Marketing
The Before-and-After Effect: Why Project Photos Are Your Best Marketing Asset as a Builder
Read More